The overlay is limited to those voxels with map values that are within a Floor (17-3) to Ceiling (17-2) absolute value range. When the Chg field choices (17-7): Pos and/or Neg, are selected, the positive and/or negative map values are overlayed, respectively. To limit map values to those with high spatial consistency, a minimum connected component count can be specified in the Min Cnt field (17-4). Only those pixels whose value lies within the inclusive range, between the floor and ceiling are candidates for membership in a cluster. A pixel is deemed to be a member of a cluster based on 8-neighbor planar connectivity. Note that the count is performed on the map image resolution which is necessarily the same as the stim image resolution. The anat image resolution can differ and isolated groups of pixels below the min cnt may appear. This is especially true when the anat and stim images are not aligned (See Section 4).
The map is overlayed in color using the map LUT (Look-Up Table), shown in the color bar (17-8). The map range given by the Map Max (17-10) and Map Min (17-9) fields, are used for the display range with the overlay LUT. The LUT indices are calculated using the same method discussed in Section 8. One important difference is that the map range is used for the absolute value of the map values. The top half of the map LUT is used for positive values and bottom half for negative values. Whenever any change is made to the map display specification fields (i.e. 17-2,3,4,9 & 10), the Update Map button (17-5) must be pressed before the map is updated.
When the planar dimensions of the images are less than the fixed 256x256 image window size, they are resized to fill the window. Either linear interpolation or pixel replication can be specified by selecting the Interpolate or the Replicate choice (17-6). This is true for both the greyscale and the map overlays.
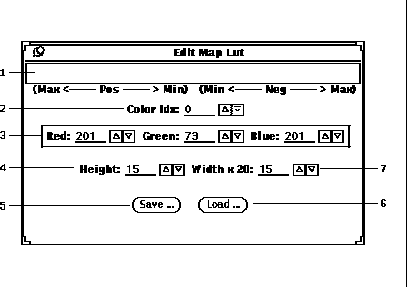
The default map LUT can be modified to personal preferences by pressing the Edit Map button (17-11) to popup the Edit Map Lut window as shown in Figure 18.
The color bar (18-1) shows the
current map LUT. LUT entries are selected by either entering
an index in the Color Idx field (18-2) or pressing the
left mouse button over the a particular location on the color bar.
The color is dynamically changed as its RGB values are modified
in the Red, Green and Blue fields (18-3),
The color bar can be saved as an indexed color TIFF file using the
Save button (18-5).
Map lut colors can be loaded with any indexed color TIFF file
using the Load button (18-6).
The TIFF image dimensions are Height (18-4)
pixels tall by Width (18-7) times the
number of lut colors pixels wide (i.e. ![]() ).
).

Figure 18: Edit Map LUT popup window.