


Next: Time-Course Cross Correlation
Up: Map Generation
Previous: Student's t Test
A Period Cross Correlation (PXC) gives a map as a
measure of the correspondence
of the shapes of a reference waveform and a
functional time course[2],
where the reference waveform is defined by periods. The reference waveform
is nearly of ``box-car'' form, except that sloping sides may be specified.
The PXC parameter popup window is shown in Figure 22.
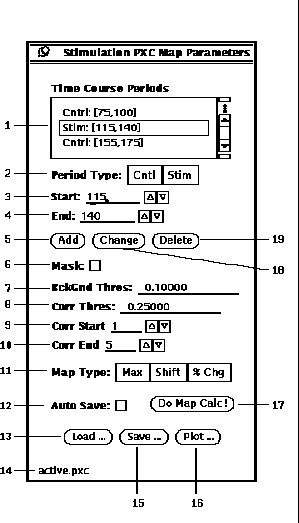
Figure 22: Period Cross Correlation Parameter popup window.
-
The first step in calculating a PXC map is to populate the
Time Course Periods
list (22-1). This is accomplished by
entering a Period Type (22-2),
Start time (22-3),
End time (22-4),
and then pressing Add (22-5).
The Change (22-18)
and Delete (22-19) buttons can be used
for editing the currently selected period from the list.
-
A graph of the reference waveform can be displayed by pressing
the Plot button (22-16).
As shown in Figure 23, the lines at
1.0 show stimulation periods and the lines at 0.0 show control periods.
Note that when there is a gap between a control and a stimulation period
that the waveform is sloped.
-
Next, one of two options can be specified to speed up the analysis
by limiting which pixels are evaluated.
If the Mask checkbox (22-6)
is selected, the BckGnd Thres (22-7)
is ignored and only those pixel
locations with non-zero values in the currently loaded mask are evaluated.
When the Mask option is not selected, then those pixels, whose control period
mean value is below the BckGnd Thres value, are not evaluated.
-
Then specify the Corr Thres (22-8).
Only those pixels whose cross correlation is above this
threshold will pass and have non-zero map values.
A value of zero is used in the map at pixel locations that are not evaluated
or whose cross correlation value is less than the threshold.
For multiple cross correlations, a pixels time course will be considered
to have passed if at least one passes.
-
When the reference waveform is shorter than the functional time course,
multiple cross correlations can be calculated. Each of these multiple
cross correlations are calculated with the reference waveform shifted
in time by an offset. The offsets are specified by entering a value
in the Start (22-9) and End (22-10) fields.
Note that both of the offsets must be less than the difference
of the lengths between the reference and functional time courses.
-
There are three Map Type choices (22-11).
The Max choice results
in the map that reflects the maximum correlation value
over all of the shift offsets.
The Shift choice results in the map that reflects the
shift offset where the maximum correlation value occurs. The shift offset
is expressed as a percentage of shift range per Equation 5.

The % Chg choice
results in a map of the ratio of the average intensity change between
the control and stimulation periods per Equation 4.
-
Prior to calculating the correlation map, the parameters must be saved to
a file. Pressing the Save button (22-15) will popup the file
browser (See Section 5).
After the parameters are saved, the name of
the file will appear in the lower left hand corner (22-14).
When any parameter is changed the file name disappears since it is no longer
consistent with the contents of the file. However, while a file name
is displayed, the AutoSave option (22-12) can be selected.
The AutoSave option will automatically save the parameters to the
current file. The Load button (22-13) can be used to retrieve
previously save parameters.
-
Having all the parameters and options set, pressing the
Do Map Calc button (22-17)
invokes the calculation of the functional map.
See Section 9.1 for the details on how to display the map.
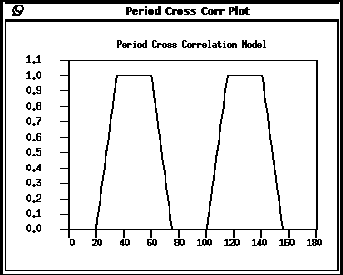
Figure 23: PXC reference waveform plot popup window.
Next: Time-Course Cross Correlation
Up: Map Generation
Previous: Student's t Test